Format String Vulnerability Process (CS4678)
The goal of this assignment was to utilize a format string vulnerability to insert and run shellcode on a service. Three kinds of exploit were required - a reverse bind shell, a reverse bind key printing, and a simple shell on the same connection. Relevant files can be found here. The following are my notes/process, cleaned and written up.
inetd and assign4 were provided for running on a target computer with ./inetd –p 4444 ./assign4. IDA_assign4.pdf is an abbreviated version of the IDA disassembly of assign4. assign4exploit_script.py is my final submitted result, including automatic scripted detection of relevant memory locations and payload delivery. Note that for “reversebind” and “key” exploits you require a listener on port 5600 of a computer you control, and my_ip_addr variable will need to be modified to hold a hex representation of said computer’s IP. This script also outputs the payload into output1.txt.
Let’s talk about process!
Step 1: Find exploitable code
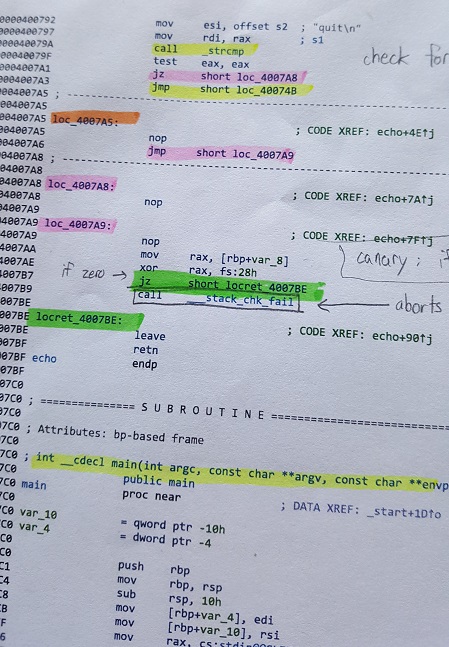
In this particular scenario, we’ve got an advantage - we already know the vulnerability we need to find and exploit is a format string issue. Finding it is significantly easier. Even so, I find it useful to print out the IDA dissassembly of the target code for marking up. Doing this allows us to see any constraints on our input, what kind of stack frames we’re working with, etc, without needing to search for target addresses with format string printouts. Since we have access to the assembled code, we might as well use it!
To follow along, grab IDA_assign4.pdf.
At first skim, the following stands out:
- The program gets input with fgets and prints it with printf. This means we can insert null bytes into the buffer (fgets will stop at a newline instead), though printf will not be able to read them.
- printf is passed our input string directly, instead of as a second argument. This means it will parse it as a format string - there’s our vulnerability.
- Although the buffer (at rbp-110h) has 264 bytes of space, fgets only reads 100h (256) bytes before looping back around. Our payload will have to be no larger than 256 bytes unless overwriting the first chunk of it in our next loop is fine.
- There’s a canary immediately below the buffer, at rbp-8h, with a value of 28h. Technically irrelevant, as fgets prevents us from doing a traditional buffer overflow anyway, but good to note. This didn’t end up being the route I took, but it does offer the potentially hilarious option of overwriting the _stack_chk_fail GOT entry to redirect to our shellcode…
- The return address is 118h (280) bytes below the buffer start.
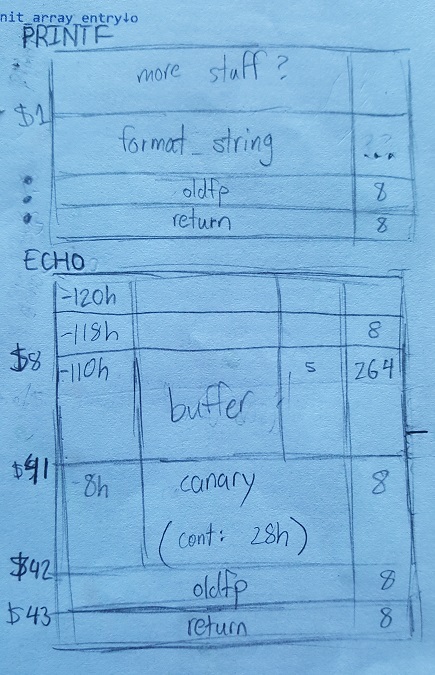
My final stack frame drawing; not very in-depth at the printf frame, but good enough for my purposes!
Knowing the above, my game plan: use printf to leak the location of the buffer in memory. Then use printf’s capabilities to overwrite the return address and jump into shellcode in the buffer.
Step 2: How can we use printf?
printf is a C function that can receive a variable number of arguments - as many as the first argument (the format string) requires! It will push arguments to the stack and go as far down as necessary to satisfy all the %s in the format string. However, this means it’s possible to deceive - if you insert a format string that requires additional arguments, but don’t provide any, printf will just continue obliviously down the stack, quickly hitting other stack frames.
This, combined with a few other printf functionalities: %#x, %n/%hn, and argument selection - will allow us to do arbitrary reads and writes into memory.
%#x and %n/%hn
%n is the strange child in the printf family - rather than printing something as a decimal, hex value, string, etc, it will write to a location. Namely, given:
printf("AAAA%n", &a);
%n will write the value 4 to whatever is pointed to by a. Why 4? %n writes the number of bytes already printed by printf. Note that as technically %n prints no bytes to output, it won’t count itself or any previous instances of itself. Similarly, a “%c” will only print one byte, not two, and %n will count it as one.
This means, if we can make sure the associated argument to %n is a pointer to our return, we can overwrite our return with a value of our choice.
We’re still limited by our fgets constraint - we only have 256 characters/bytes to work with in our actual format string. Does this mean we can only write a 254-or-less value to our pointer with %n? No, thanks to %#x. (Or %#c, etc)
printf("%100x", num);
The above prints num as a 100-byte-wide hex value, regardless of how many bytes num actually requires for printing. This means, if followed by a %n, 100 will be written to our memory location! We can use this to write significantly larger numbers - especially consecutively, as %n is cumulative. Printing 100 characters, %n, 100 more, and %n again will have the second %n write 200 to memory.
Of note, found through experimentation - %0010x will happily print a ten-byte-wide value. However, %#x will always print at least the minimum amount of bytes the associated argument requires. If an argument requires 4 bytes to print, and you attemp %0x or %2x, it will still write all 4 bytes. It will only pad, not truncate.
Finally, there’s %hn - which is an %n that writes only two bytes to memory. This is particularly useful for large numbers like 0x7fffffffec50, etc, which would be in the 100+ trillion range as a whole but, if written as 0x7fff, 0xffff, and 0xec50, never go above 70 thousand. No need for trillion-wide values - just enough 2-byte-offset addresses to overwrite an entire pointer!
Argument selection
printf has another useful feature for exploitation - rather than using stack arguments in the set order they were (ostensibly) inserted, you can tell printf to jump to specific arguments.
printf("%2$x", num, num2);
The above will print num2, not num1! This is useful for arbitrary memory reading (or writing into, with %#$n….) of any place below us in the stack! We can always tell printf to print argument 27 even if we’ve only pushed 2… or 0. We just need to make sure that everything is argument (8-byte) aligned.
All together, what does this mean?
We need to find how many arguments below our format string our actual buffer starts, so we can select “arguments” from inside our buffer. We also need to leak the memory location of… honestly, anywhere in our mapped stack frames (this is where the drawing earlier comes in handy, we know where everything is in relation to everything else!) so that we can use that as a base address for relative addressing. Once we can do both things, we can craft our payload.
Step 3: Creating the format string exploit
If at all possible, run the vulnerable code on a target machine with stack randomization turned off at first. Our end result needs to work even with stack randomization, but for testing purposes, this makes reproducible results easier to obtain - and also, working on our overall strategy a lot simpler.
First, let’s leak the memory location. Connecting to the vulnerable service with netcat and sending
python -c 'print("%1$p")' | nc [ip] 4444
to it gives us the pointer to our format string - in this case, the buffer in the echo function’s stack! Our leak, nice and simple. We can add or subtract to/from this address to get wherever we want to go.
In my case, the address without randomization was 0x7fffffffec50. I could add 280 to this to get echo’s return pointer address - 0x7fffffffed68.
The top of the stack is also argument 8$ as far as printf is concerned. That means we can use anything at 8-byte offsets in our buffer as arguments. Let’s try a first, simple exploit.
python -c 'print("%9$nAAAA"+"\x68\xED\xFF\xFF\xFF\x7F\x00\x00")' | nc 192.168.6.140 4444
(“To whatever is pointed to by argument 9, write 0 - since printf hasn’t written any characters yet. Write AAAA - padding to get to 9$. Then a little-endian address at exactly 9$ - the address of our return pointer. printf won’t actually print the whole address thanks to those null bytes at the end, but that’s irrelevant - we only need printf to handle the %n bit at the very beginning, fgets has already written the address into the buffer at this point.)
What’s our result over on the target machine?
assign4[950]: sefault at 0 ip 0000000000000000...
Nice. We overwrote the return address of echo, so that when it returned, it would try to jump to a next instruction at 0. Of course, this causes a segmentation fault. We can successfully aim at and overwrite the return pointer.
Now we need to inject our shellcode and make sure the return pointer is overwritten to point to it!
One complication: we’re going to be injecting our shellcode into our buffer, which starts at address 0x7fffffffec50 - or 140737488350288 in decimal. Do we really want to write %140737488350288x…? If nothing else, this is going to take our attacking machine a while.
Better solution? Use %hn, as mentioned above in part 2. Split 0x7fffffffec50 - or rather, I used 0x7fffffffecb0, since of course we need room for our format string/etc at the front of our buffer before our shellcode - into 3 chunks. 0x7fff 0xffff and 0xecb0 are only 32767, 65535, and 60592 in decimal - far more manageable. We need to write these into our return in two byte chunks. (ie, at location 0x7fffffffed68, ed6a, ed6c…)
Remember that %n (or %hn) is cumulative, though. 0x7fff can still be written first, but 0xecb0 has to be written next, since it’s smaller than 0xffff. This means we’ll be writing our 2-byte chunks out of order! Not a big deal, just something to keep track of.
Let’s build our payload.
"%32767x"       # write 7fff
+ "%16$hn"      # write to portion of return pointed to by 16$
+ "%27825x"     # write ecb0.
+ "%14$hn"      # remember, cumulative - that's why we did 27825x
+ "%04943x"     # write ffff
+ "%15$hn"
+ "AAAAAAAAA"   # some padding to align our below addresses properly
+ "\x68\xED\xFF\xFF\xFF\x7F\x00\x00"    # 14$
+ "\x6A\xED\xFF\xFF\xFF\x7F\x00\x00"    # 15$
+ "\x6C\xED\xFF\xFF\xFF\x7F\x00\x00"    # 16$
+ "\x90"*32     # some noops. we don't really need these, but I like aiming at them
+ shellcode_here
Sending this through a python print piped through an nc gets us… well, depends on what we inserted as our shellcode! But if it was a reverse-bind, and we had a listener open, then we would indeed get a connection from the target/victim machine with a shell.
Since we based our strategy on memory leaks, no gdb or definite stack knowledge necessary, this can be reproduced easily with stack randomization! It’s just simpler not to have to recalculate every time thanks to the stack moving around until you have a strategy you can automate.
Step 4: Automating the format string exploit
From here all we need is to code up this strategy into a script that we can point at the vulnerable service. This is… not any more difficult than creating the original exploit, but slightly obnoxious thanks to things like big/little-endian storage, etc.
I wrote my script in python - it can be found up above through that relevant files link - and here are some potentially-useful notes:
- I found it a lot easier to make certain the format-string, address, and noop portion of my payload would always be the same length, rather than having to adjust padding after my format-string or (worse) shellcode addressing. This doesn’t require any additional code except for the format string portion, and there the only things that would need to be adjusted are the %#x sections. Those just need to be zero-padded in front. Python has a useful zfill function for this purpose.
- Write a tiny function to flip big-endian addresses to little-endian. You will thank yourself.
- I dealt with arguments needing to be written in different orders, depending on the stack address, by creating a list of tuples and arranging based on hex number size. In the final format string, this shuffles around my %#$hn sections based on the %#x sections. You can instead shuffle around the addresses if you’re so inclined, it wouldn’t make a huge difference - just decide on a strategy and stick to it!
- Sometimes python is finicky. If I didn’t make it sleep after my first send through the socket, it wouldn’t receive the response. If I shut down my socket at the end, even after seemingly successfully placing and executing my shellcode, the shellcode wouldn’t run properly - I had to leave the socket open. Yes, even for a reverse bind using another socket. Be ready for fiddling and other weird tiny pitfalls that don’t necessarily mean your payload or shellcode were incorrect.